# UnityHFSM
**Repository Path**: clrt6174/UnityHFSM
## Basic Information
- **Project Name**: UnityHFSM
- **Description**: No description available
- **Primary Language**: Unknown
- **License**: MIT
- **Default Branch**: master
- **Homepage**: None
- **GVP Project**: No
## Statistics
- **Stars**: 0
- **Forks**: 1
- **Created**: 2023-05-07
- **Last Updated**: 2023-05-07
## Categories & Tags
**Categories**: Uncategorized
**Tags**: None
## README


A simple yet powerful **hierarchical finite state machine** for the Unity game engine. It is scalable and customisable by being **class-based**, but also supports functions (or lambdas) for **fast prototyping**.
Thanks to overloading, it minimises boilerplate code while still supporting **generics**.
It has a special focus on the temporal aspects of state transitions, making it ideal for timing and synchronisation sensitive problems.
- [Fast prototyping](#simple-state-machine)
- [Hierarchical features](#hierarchical-state-machine)
- [Timing of state changes](#timing-of-state-changes)
- [Multiple state change patterns](#state-change-patterns)
- [Control flow of OnLogic](#control-flow-of-onlogic)
- [Unity **coroutines**](#unity-coroutines)
- [Scalable (class-based)](#class-based-architecture)
### Why use UnityHFSM?
- State machines are an amazingly easy way to write and organise game logic. (As soon as you have states, e.g. Walk, Run, Sneak, Jump, you can use a state machine)
- It's **easy** and **straightforward** to use
- It helps you **tame complex behaviour** (e.g. weapon handling -> cooling, ammo, reload, fire) or write AI for NPCs
- Helps you write **self documenting code**, that is **maintainable** and **readable**
- **Reduces the boilerplate** code required to write a state machine
- UnityHFSM is **lightweight** and **efficient**, making it perfect for solving small and big problems
- It is **especially designed for Unity**, and supports **Coroutines**, which would otherwise be difficult to implement in a state machine
- **No GC Allocations** for state changes / updates / ... after setting up the state machine (-> No unwanted GC related lag spikes because of the state machine)
- The code is **well documented**
- It is **not a component** (MonoBehaviour) and therefore has a **low overhead**
- By being hierarchical, it can reduce the amount of duplicate code between states
---
## Installation
### Unity Package
To get started, download the latest version of UnityHFSM from the [Releases](https://github.com/Inspiaaa/UnityHFSM/releases) page. Simply extract the zip file and put the folder anywhere in your `Assets` folder. Et voilà, you're ready to go!
### UPM Package
Add from OpenUPM | via scoped registry
To add OpenUPM to your project:
- Open `Edit/Project Settings/Package Manager`
- Add a new Scoped Registry:
```
Name: OpenUPM
URL: https://package.openupm.com/
Scope(s): com.inspiaaa.unityhfsm
```
- Click Save
- Open Package Manager
- Select ``My Registries`` in dropdown top left
- Select ``UnityHFSM`` and click ``Install``
Add from GitHub | no updates through PackMan
You can also add it directly from GitHub on Unity 2019.4+. Note that you won't be able to receive updates through Package Manager this way, you'll have to update manually.
- Open Package Manager (Window > Package Manager)
- Click +
- Select Add from Git URL
- Paste
- `https://github.com/Inspiaaa/UnityHFSM.git#upm` for the latest stable release (**recommended**)
- `https://github.com/Inspiaaa/UnityHFSM.git` for the development version
- `https://github.com/Inspiaaa/UnityHFSM.git#v1.8.0` for a specific version (`v1.8.0` here)
- Click Add
- Tip: If you're using VSCode and you're not getting any IntelliSense, you may have to regenerate the `.csproj` project files (Edit > Preferences > External Tools > Regenerate project files)
---
## Example
## Simple State Machine
Here's a simple state machine for an enemy spy in your game.
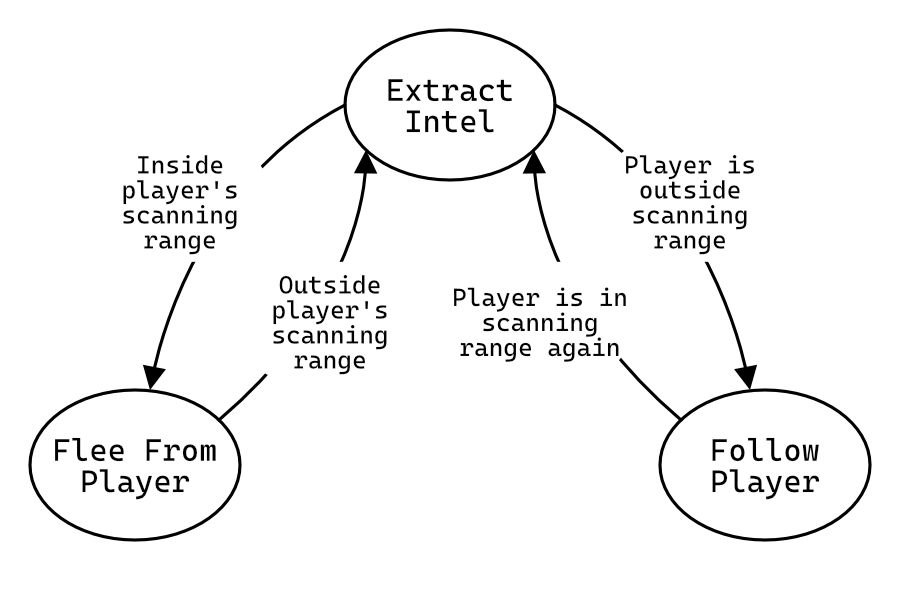
As you can see the enemy will try to stay outside of the player's scanning range while extracting intel. When the player goes too far away, it will follow the player again.
### The idea:
- Initialise the state machine
- Add states:
```csharp
fsm.AddState( new State(
onEnter,
onLogic,
onExit
));
```
- Add transitions
```csharp
fsm.AddTransition( new Transition(
from,
to,
condition
));
```
- Run the state machine
```csharp
void Update {
fsm.OnLogic()
}
```
#### Initialising the state machine
```csharp
using System.Collections;
using System.Collections.Generic;
using UnityEngine;
using FSM; // Import the required classes for the state machine
public class EnemyController : MonoBehaviour
{
private StateMachine fsm;
public float playerScanningRange = 4f;
public float ownScanningRange = 6f;
void Start()
{
fsm = new StateMachine();
}
}
```
#### Adding states
```csharp
float DistanceToPlayer()
{
// This implementation is an example and may differ for your scene setup
Vector3 player = PlayerController.Instance.transform.position;
return Vector2.Distance(transform.position, player);
}
void MoveTowardsPlayer(float speed)
{
// This implementation is an example and may differ for your scene setup
Vector3 player = PlayerController.Instance.transform.position;
transform.position = Vector2.MoveTowards(transform.position, player, speed * Time.deltaTime);
}
void Start()
{
fsm = new StateMachine(this);
// Empty state without any logic
fsm.AddState("ExtractIntel", new State());
fsm.AddState("FollowPlayer", new State(
onLogic: (state) => MoveTowardsPlayer(1)
));
fsm.AddState("FleeFromPlayer", new State(
onLogic: (state) => MoveTowardsPlayer(-1)
));
// This configures the entry point of the state machine
fsm.SetStartState("FollowPlayer");
// Initialises the state machine and must be called before OnLogic() is called
fsm.Init();
}
```
Although this example is using lambda expressions for the states' logic, you can of course just pass normal functions.
#### Adding transitions
```csharp
void Start()
{
// ...
fsm.AddTransition(new Transition(
"ExtractIntel",
"FollowPlayer",
(transition) => DistanceToPlayer() > ownScanningRange
));
fsm.AddTransition(new Transition(
"FollowPlayer",
"ExtractIntel",
(transition) => DistanceToPlayer() < ownScanningRange
));
fsm.AddTransition(new Transition(
"ExtractIntel",
"FleeFromPlayer",
(transition) => DistanceToPlayer() < playerScanningRange
));
fsm.AddTransition(new Transition(
"FleeFromPlayer",
"ExtractIntel",
(transition) => DistanceToPlayer() > playerScanningRange
));
}
```
#### Initialising and running the state machine
```csharp
void Start()
{
// ...
fsm.Init();
}
void Update()
{
fsm.OnLogic();
}
```
## Hierarchical State Machine
Because StateMachine inherits from StateBase, it can be treated as a normal state, therefore allowing for the nesting of state machines together with states.
### Expanding on the previous example
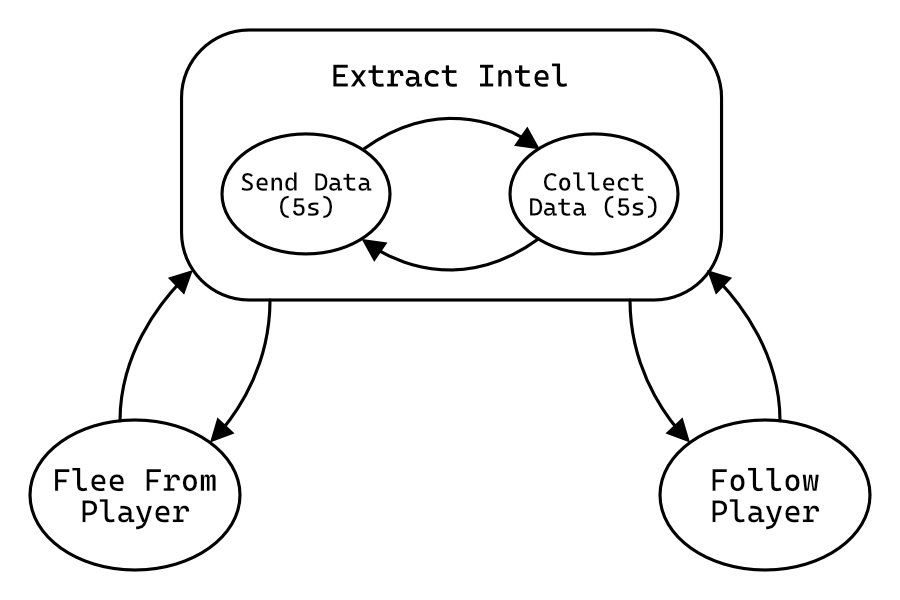
So that you can see a visual difference, the enemy should be spinning when it enters the "SendData" state.
### The idea:
- Create a separate state machine for the nested states (States in Extract Intel)
- Add the nested states to the new state machine
- Add the new state machine to the main state machine as a normal state
#### Separate FSM for the ExtractIntel state
```csharp
void Start()
{
// This is the main state machine
fsm = new StateMachine();
// This is the nested state machine
StateMachine extractIntel = new StateMachine(needsExitTime: false);
fsm.AddState("ExtractIntel", extractIntel);
// ...
}
```
#### Adding States and Transitions
```csharp
void RotateAtSpeed(float speed)
{
transform.eulerAngles += new Vector3(0, 0, speed * Time.deltaTime);
}
void Start()
{
fsm = new StateMachine();
StateMachine extractIntel = new StateMachine(needsExitTime: false);
fsm.AddState("ExtractIntel", extractIntel);
extractIntel.AddState("SendData", new State(
onLogic: (state) =>
{
// When the state has been active for more than 5 seconds,
// notify the fsm that the state can cleanly exit
if (state.timer > 5)
state.fsm.StateCanExit();
// Make the enemy turn at 100 degrees per second
RotateAtSpeed(100f);
},
// This means the state won't instantly exit when a transition should happen
// but instead the state machine waits until it is given permission to change state
needsExitTime: true
));
extractIntel.AddState("CollectData", new State(
onLogic: (state) => {if (state.timer > 5) state.fsm.StateCanExit();},
needsExitTime: true
));
// A transition without a condition
extractIntel.AddTransition(new Transition("SendData", "CollectData"));
extractIntel.AddTransition(new Transition("CollectData", "SendData"));
extractIntel.SetStartState("CollectData");
// ...
}
```
What is `fsm.StateCanExit()` and `needsExitTime`? (See the next paragraph below)
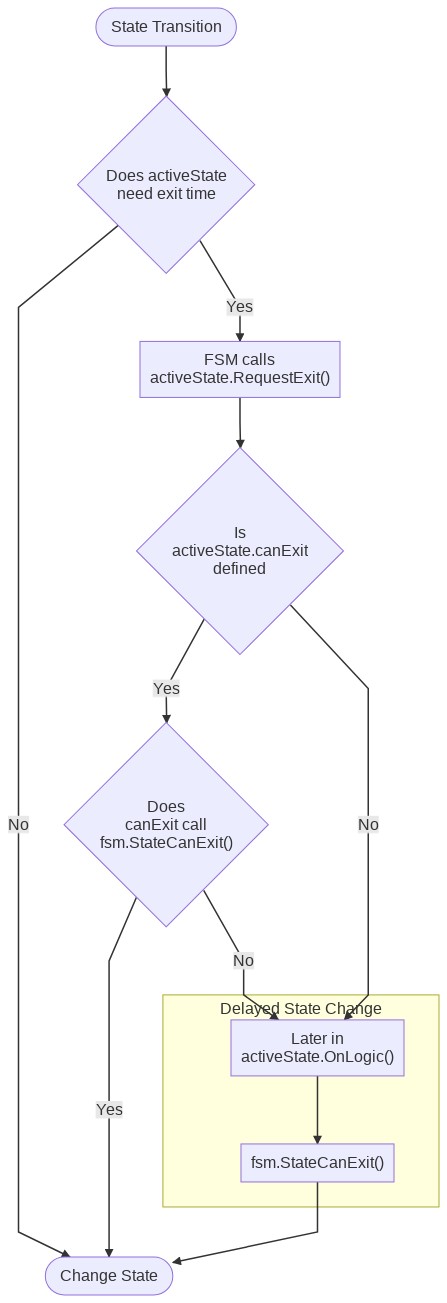
## Timing of state changes
When needsExitTime is set to false, the state can exit any time (because of a transition), regardless of its state (Get it? :) ). If it is set to true this cannot happen (unless a transition has the `forceInstantly` property set to true). This is very useful when you do not want an action to be interrupted before it has ended, like in this case.
But when is the right time for the state machine to finally change states? This is where the `fsm.StateCanExit()` method comes in and another argument for the `State` constructor: `canExit`. `fsm.StateCanExit()` notifies the state machine that the state can cleanly exit.
1. When a transition should happen, the state machine calls `activeState.RequestExit()`, this in turn calling the `canExit` function. If the state can exit, the `canExit` function has to call `fsm.StateCanExit()` and if not, it doesn't call `fsm.StateCanExit()`.
2. If the state couldn't exit when `canExit` was called, the active state has to notify the state machine at a later point in time, that it can exit, by calling the `fsm.StateCanExit()` method.
## State Change Patterns
The state machine supports three ways of changing states:
1. Using `Transition` objects as described earlier. You can even have multiple transitions that connect the same two states. They are checked on every OnLogic call and can be seen as a type of polling.
```csharp
fsm.AddTransition( new Transition(
from,
to,
condition
));
```
2. Calling the `RequestStateChange` method: Instead of using Transition objects to manage state changes, each state can individually also manage its own transitions by directly calling the `RequestStateChange` method.
```csharp
fsm.RequestStateChange(state, forceInstantly: false);
```
**Example**
```csharp
fsm.AddState("FollowPlayer", new State(
onLogic: (state) =>
{
MoveTowardsPlayer(1);
if (DistanceToPlayer() < ownScanningRange)
{
fsm.RequestStateChange("ExtractIntel");
}
}
));
```
3. Using "Trigger Transitions": These are normal transitions that are only checked when a certain trigger (an event) is activated.
These are really handy when a polling-based solution does not fit or is not efficient enough. Trigger Transitions let you effortlessly leverage the efficiency of event-based transitions, in combination with the full power of the existing high-level transition types.
```csharp
fsm.AddTriggerTransition(triggerName, transition);
```
**Example**
```csharp
// Flappy Bird Example
fsm.AddTriggerTransition(
"OnCollision",
new Transition("Alive", "Dead")
);
// Later
fsm.Trigger("OnCollision");
```
Therefore UnityHFSM supports both polling-based and event-based transitions, as well as the feature to bypass the concept of transitions all together. That's pretty cool.
There is also a slight variation of the `Transition` state change behaviour, that allows you to change to a specific state from any other state (a "global" transition as opposed to a "local" / "direct" transition). They have the same `forceInstantly` / `needsExitTime` handling as normal transitions.
```csharp
fsm.AddTransitionFromAny( new Transition(
from,
to,
condition
));
// For Trigger Transitions
fsm.AddTriggerTransitionFromAny(
triggerName,
transition
);
```
**Example**
```csharp
fsm.AddTransitionFromAny( new Transition(
"", // From can be left empty, as it has no meaning in this context
"Dead",
t => (health <= 0)
));
// For Trigger Transitions
fsm.AddTriggerTransitionFromAny(
"OnDamage",
new Transition("", "Dead", t => (health <= 0))
);
```
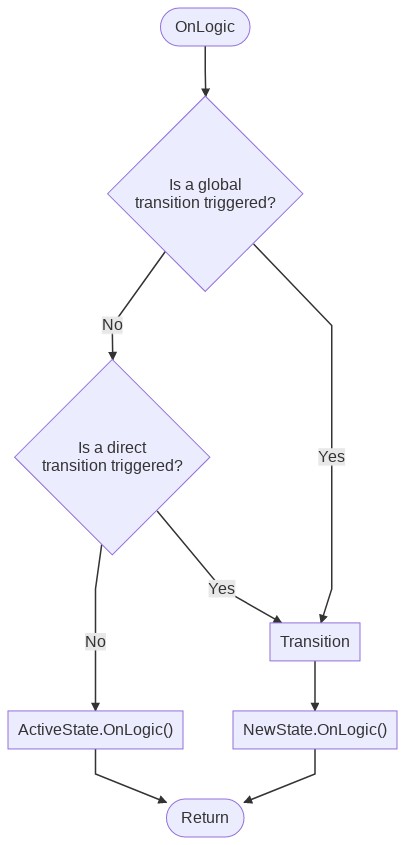
## Control flow of OnLogic
Every StateMachine's `OnLogic` method manages the automatic transitions via `Transition` (`TransitionBase`) objects and the active state's logic function.
Here's what happens:
1. The state machine checks all global transitions (transitions from any state) and sees if a transition should occur. If this is the case, the state machine will advance to the new state, and call the new state's `OnLogic` function.
2. If this is not the case, the fsm checks all direct transitions (transitions that go directly from the active state to another state) and sees if a transition should occur. If this is the case, the state machine will move on to the new state, and call the new state's `OnLogic` function.
3. If this is not the case, the fsm will finally call the currently active state's `OnLogic` function.
Because global transitions are checked first, they have the highest priority. The reason for this can be illustrated with the following example: When the health of the player drops below 0, regardless of which state the fsm is in, it should transition to the `Dead` state.
As you can see on the steps mentioned above, only one transition can occur per `OnLogic` call. This has many reasons, one of which being that the state machine does not get stuck in an infinite loop.
## Unity Coroutines
By using the `CoState` class you can run coroutines. This class handles the following things automatically:
- Starting the Coroutine
- Running the Coroutine again once it has completed
- Terminating the Coroutine on state exit
As a result of a [limitation of the C# language](https://stackoverflow.com/questions/35473442/yield-return-in-the-lambda-expression), you can sadly not use lambda expressions to define IEnumerators (=> Coroutines).
In this example, we can replace the `SendData` state with a more advanced one, which makes the spy turn in one direction for two seconds, and the in the other direction for the same duration.
```csharp
IEnumerator SendData(CoState state)
{
while (state.timer.Elapsed < 2)
{
RotateAtSpeed(100f);
// Wait until the next frame
yield return null;
}
while (state.timer.Elapsed < 4)
{
RotateAtSpeed(-100f);
yield return null;
}
state.timer.Reset();
// Because needsExitTime is true, we have to tell the FSM when it can
// safely exit the state
state.fsm.StateCanExit();
}
void Start()
{
// ...
extractIntel.AddState("SendData", new CoState(
this, // Pass in the MonoBehaviour that should run the coroutine
onLogic: SendData,
needsExitTime: true
));
// ...
}
```
## Class based architecture
Because the states, transitions and the state machine itself are implemented in a object oriented manner, custom state and transition classes can be created. By inheriting from the common base classes (`StateBase`, `TransitionBase`), custom states and transitions can be developed.
This is also how `CoState`, `TransitionAfter`, ... have been implemented internally.
**Creating your own states**
Simply inherit from the base class `StateBase` and override the methods you need.
```csharp
class CustomSendData : StateBase
{
MonoBehaviour mono;
// Important: The constructor must call StateBase's constructor (here: base(...))
// because it declares whether the state needsExitTime
public CustomSendData(MonoBehaviour mono) : base(needsExitTime: false)
{
// We need to have access to the MonoBehaviour so that we can rotate it.
// => Keep a reference
this.mono = mono;
}
public override void OnEnter()
{
// Write your code for OnEnter here.
// If you don't have any, you can just leave this entire method override out.
}
public override void OnLogic()
{
this.mono.transform.eulerAngles += new Vector3(0, 0, 100 * Time.deltaTime);
}
}
void Start()
{
// ...
extractIntel.AddState("SendData", new CustomSendData(this));
// ...
}
```
# Development
### Running the tests
UnityHFSM has a test suite that can be run from Unity's Test Runner window.
1. Open Window > General > Test Runner
2. To run the tests, click the Run All button
More documentation coming soon...